

How to Intersect Masks in Lightroom
- Michael Rung
- Nov 15, 2021
- 4 min read
Updated: Jul 10, 2024
Understand how intersecting masks work, and how they can help you with your Lightroom editing
The following blog and video were produced prior to the February 2022 Lightroom release (version 5.2), which added the Intersect Mask With option that was originally only included in Lightroom Classic.
Read on to gain an understanding of how the mask intersection tool works, and to see some examples of how it can help you with your Lightroom editing. You can also use the same steps to manually intersect masks in the Lightroom mobile apps.
If you're not comfortable with masking in Lightroom yet, I strongly recommend watching my full deep-dive Lightroom Masking tutorial.
Prefer to watch instead of read? Check out the video version of this guide here:
It's been a bit of a whirlwind, but I've been working to keep up with all the comments on my Lightroom Masking tutorial video and answer any questions viewers have asked, or just respond to comments in general.
As it turns out, one person said something that I initially thought was wrong: they stated that Lightroom "Cloud" didn't get all of the Masking tools. Specifically, Lightroom is missing the Intersect option (note that Lightroom refers to the non-Classic desktop app but the same "missing feature" applies to the mobile apps, as well). I thought surely they were mistaken and was about to say so… but luckily I decided to double check for myself and, sure enough, the Intersect Mask With option in the Masking tools is nowhere to be found!
Since that first comment about it, several others have asked about this "missing" feature in Lightroom, either in the video comments or elsewhere on social media.

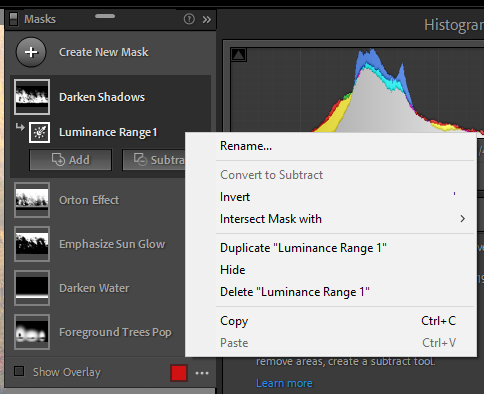


Lightroom Classic vs. Lightroom (note the missing Intersect Mask With option)
What Does "Intersect Mask With" Do?
All Intersect Mask With does is "automate" a couple steps but you can still easily recreate the effect. First, let's quickly run down what intersecting a mask actually does.
In Lightroom Classic, when you intersect one mask with another you're essentially telling the app to only apply your desired adjustment where those two masks overlap with each other. For instance, you may want to use a brush mask to apply a broad-stroke adjustment to an image but then limit the impact to only a certain color. Simply create a brush mask and then intersect it with a color mask for the color you want to adjust.
When you choose Intersect Mask With when right-clicking on a mask, Lightroom Classic creates a new mask (within the same mask group) and - this is the key - subtracts and inverts it. Using my brush and color intersection example, Lightroom Classic subtracts the color from your original brush mask ("apply the brush but not to these areas") but then inverts that subtraction ("apply the brush to only these areas", in other words where the brush and the picked color overlap, and nowhere else).


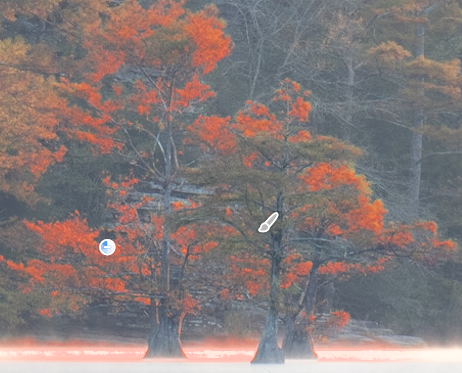
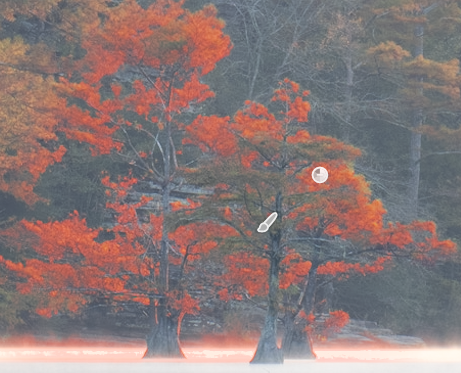
As you can see in the screenshots above, what started as a "sloppy" brush mask was refined significantly after I intersected the brush mask with a color range mask. Another way of looking at it is I subtracted all the colors from the brush mask except for the color I chose (AKA an inverted color range selection).
Intersect Mask With takes what would otherwise be a two-step process and turns into a one-step task.
How to Create an Intersecting Mask in Lightroom
Since Lightroom Mobile still does not have the Intersect Mask With option, you'll need to perform the two-step process manually after creating the initial "primary" mask (Brush 1 in this example). The following screenshots are for Lightroom "Cloud" on a desktop computer but the steps and icons are the same in the mobile app:
While still in the same mask group, choose Subtract (in this example, subtract a color range):

2. Then invert the subtracted color range:

In the following screenshot you can see a comparison of a mask intersection that I synced over to Lightroom from Lightroom Classic versus the subtract+invert mask I created directly in Lightroom. Note that they are identical!

They both show that they are a color range mask subtracted (note the circled minus sign on each icon) from the primary mask (Brush 1). There's no icon indication that they are inverted or intersected but, for proof, here's a comparison of the mask overlays created via both methods (the color range selection I made wasn't quite identical but it's close enough to make the point):


Admittedly, it's a bit clunky to describe this in text so if you're not quite clear on what to do check out the quick tutorial video. The bottom line, though, is that you absolutely can create intersecting masks in any version of Lightroom!
It seems odd Adobe didn't include that option in every version but hopefully they'll add the actual Intersect Mask With option in a future update to limit confusion and provide a simpler solution.

Support My Work
I've been pursuing my passion for photography, while producing educational resources and other content, for several years now. It has required plenty of time, patience, and monetary investment. Without my supporters, none of it would be possible. Every contribution, no matter the amount, allows me to continue creating new work while sharing my love for the natural world.
Become a member of my Patreon to earn exclusive perks, such as ad-free videos, early access to my ebooks, exclusive discounts, and even free prints and limited-edition folios.

You may also make a one-time donation via PayPal. However you choose to contribute, it will be greatly appreciated.
Join the Community
Sign up for a free site membership to leave comments under your own name and receive notifications when I or others reply to your comments (or like them). You'll also receive a special welcome offer towards your next order of my open-edition fine art prints.


