

Topaz Labs Photo AI Review
- Michael Rung

- Sep 3, 2022
- 27 min read
Updated: Dec 30, 2024
How good is the all-new Topaz Photo AI compared to DeNoise AI and Sharpen AI?
Important Update (April 2024)
As originally announced, Topaz Labs has now done away with the standalone versions of DeNoise and Sharpen AI. You can still find them listed on the site by doing some digging, but they include a disclaimer that they are now included in Photo AI.
Although I haven't produced an updated look at Photo AI in a while, from what I have seen, it is now a fully capable solution for your AI-powered noise reduction and sharpening needs. Interestingly, Topaz recently released a new version of Gigapixel AI so, for now, it appears they will be offering AI upscaling solutions within Photo AI and in the standalone Gigapixel app.
Contents
Introduction
Let's get this out of the way: This is an in-depth look at the results from Topaz Labs Photo AI, a new piece of AI-based photo restoration software from the makers of the popular Topaz DeNoise AI, Sharpen AI, and Gigapixel AI software tools (and others).
The intent of this post isn't to get into the nitty gritty details of how Photo AI works, or its options (or lack thereof) compared to the standalone AI apps included in the Topaz Image Quality bundle. Instead, I want to provide you with a look at a large sampling of actual results, across several types of photos that vary in subject, noise, and sharpness, using - for the most part - the automated settings in Photo AI.
All the examples shown below, and in my companion video, were generated with the beta version 0.8. I've included a section below where I'll share any news regarding further updates to the beta app.

In some cases, you'll see the Photo AI results up against the original file only. In several examples, however, I also ran the same image through the standalone tools, whether that was DeNoise AI or Sharpen AI (or both, in a couple cases), so you can see how the all-in-one Photo AI tool stacks up against the more robust apps that are dedicated to specific issues (noise, focus, or both).
To see real-time results, and "live," unfiltered commentary on several images as I ran them through Photo AI, please check out the companion video for this blog post. The video has only been edited in some cases to remove or speed up load times, for miscellaneous commentary retakes, or editing out segments of dead air or other moments that added nothing of value.
You can watch the video here:
Affiliate Disclosure
For full disclosure, I am an affiliate of Topaz Labs, meaning I earn a small commission off any purchases made through my affiliate link. Setting that aside, you're getting honest results, and my honest impressions. I've been using Topaz Labs' tools for a few years now and, in the right cases, I firmly believe in their applications... otherwise I wouldn't be an affiliate.
If what you see here is enough to spur you to make a purchase, or renew your update license, I would of course greatly appreciate it if you did so through my affiliate link as it's an easy way for you to help support me.
And it's at no added cost to you! The same goes for the rest of my affiliate links, which you can find on my About Me page.
Topaz Labs is not sponsoring this content, nor did they ask or encourage me to make it.
Sample Files Download
Most of the files I used for this blog post, and in the video, can be downloaded (in JPEG format) from my free downloads page. Simply go that page, find the Photo AI Results and Comparisons tile, and click the Download button to start the process.
What is Photo AI by Topaz Labs?
Per Topaz Labs themselves, they're "building Topaz Photo AI to be an autopilot for image quality."
Their goal - or mission - is in line with one of my biggest complaints about their Topaz DeNoise AI and Sharpen AI tools, especially: it can be difficult to determine which app is the right one for a specific photo and playing with all the different settings within each app can be time consuming.
Additionally, some photos can benefit from DeNoise AI and Sharpen AI, which requires generating a large TIFF file to run through one or the other, pulling it back into Lightroom (for my workflow, at least), and then running the first Topaz output TIFF through the other Topaz application.
Those steps don't even account for any need to upscale a heavily cropped photo, or one taken with an older digital camera where you have smaller files to begin with.
In a worst-case scenario, your workflow may look like this: Lightroom/Photoshop > Topaz DeNoise > LR/PS > Topaz Sharpen > LR/PS > Topaz Gigapixel.
Yeesh.
I actually have some files that I know would require that kind of back-and-forth work between apps, and it's hard to find the motivation to deal with it.
Enter Topaz Photo AI.
They call it an autopilot solution. You could also call it a one-stop-shop or one-click solution. Photo AI can, in theory, tackle everything in one app, with minimal tinkering. From noise reduction, to sharpening, to upscaling, Photo AI can do it all in one app at the same time. That concept is really appealing, and I don't think it takes a leap of faith to assume it's also the future of these kind of photo restoration apps (Topaz has more or less said as much).

Photo AI attempts to detect the unique problems with each image you throw at it, using Topaz Labs' AI models to determine the issues and apply the right corrections, ideally without any input from you (although you do have some ability to tweak the recommended settings).
As I write this (late August/early September 2022), it's important to note that Photo AI is still a beta software solution. There are some glitches, although most have been ironed out by now (the results you'll see below were generated using version 0.8 and I only encountered one obvious bug, which you can see in the video and in the second sample output file).
The first "official" version of Photo AI is expected to release in September 2022. For more information, check out Topaz's Photo AI FAQ. They plan to continue to add more features over time to give more input and control over results, so this is definitely an evolving product.
You can help support my full-time pursuit of photography by purchasing through this affiliate link (click on the banner image), at no added cost to you. It is always appreciated!
How to Download Photo AI
Photo AI is available to anyone that has a current license for Topaz's Image Quality bundle. That bundle includes Topaz DeNoise AI (noise reduction and some sharpening), Sharpen AI (sharpening and some noise reduction), and Gigapixel AI (upscaling).
As I write this, the bundle is on sale for only $199 USD (instead of 259.97). While that may seem like a high price, keep in mind it includes three pieces of software and gives you the following benefits:
Lifetime licenses: You'll never lose access to the tools you've downloaded
12 months of free updates: For the first year all updates are included
Inexpensive renewals: After 12 months, you can renew for a lower price to continue receiving updates
Although I assume the renewal price may change over time (like anything), I recently renewed my Image Quality subscription for only $79 to receive another year of updates for the included apps.
Whether you already have an active upgrade license for the bundle, need to renew, or are looking to purchase it for the first time, once you have an active Image Quality bundle license (meaning you are eligible for updates) you can download Photo AI for free. *
If you only own one or two of the three Image Quality apps, you can add the missing pieces and then you'll qualify for free access to Photo AI. *
* The beta version is free for active Image Quality bundle subscribers. I have not been able to confirm if it will remain free once it's officially released. Stay tuned.
In-Depth Look at Photo AI Results
Okay, here we go! Grab a tasty beverage and get comfortable: It's time for the good stuff!
As a reminder, to gain access to high resolution sample files, head to my Free Downloads page. The images you'll see below are all screenshots out of Lightroom Classic for the sake of easy comparison between the originals and the Photo AI results, so the quality is a bit reduced (it's also to avoid long load times on this blog post).
All example screenshots are shown at 100% zoom from within Lightroom Classic, to better show off the details. You can click on any of the comparison views to see a larger version, as well.
Many of the example files I used are from several years ago, when I was shooting handheld a lot more (requiring higher ISO) while also using a crop sensor camera, which generally doesn't perform as well with higher ISO. I've listed camera, lens, and ISO information for each photo, so you know what generated the source raw files.
(Please don't judge the quality of my older work too harshly!)
If you have any questions about the tests or the results, don't hesitate to drop questions in the comments section at the end!

EXAMPLE 1
Canon 80D, Canon EF 75-300mm, ISO 400
Raw file unaltered except for de-fringing in Lightroom (default Lightroom sharpening)
My Visually Perceived Issues:
Moderate noise in shadows
Image is soft

Photo AI Output Settings:
Autopilot Remove Noise settings (unaltered)
My Verdict:
Very poor-quality image to start with given crop sensor and lower quality kit lens
Some sharpness recovered, and the shadows cleaned up nicely
Some artifacts introduced in the background leaves
Overall, not terribly impressive, but it's a pretty lousy file... which was kind of the point to start out this series of tests
EXAMPLE 2
Canon 80D, Tamron SP 70-200mm G2, ISO 800
Raw file unaltered (default Lightroom sharpening only)
My Visually Perceived Issues:
Slightly noisy from higher ISO
Focus is not sharp on main subject (dog)

Photo AI Output Settings:
Autopilot Remove Noise settings (unaltered)
Manual Sharpen settings added
My Verdict:
Photo AI did not detect softness in the image, which was disappointing
Autopilot settings did a good job of removing ISO noise but did nothing to improve sharpness
Manually added Sharpen adjustments introduced some artifacts, but it wouldn't be too obvious at normal viewing sizes/distances
There is a digital glitch on final file (see video)
EXAMPLE 3
Canon 80D, Tamron SP 150-600mm G2, ISO 1600
Raw file unaltered (default Lightroom sharpening only)
My Visually Perceived Issues:
Focus is slightly soft
Lots of high ISO noise

Photo AI Output Settings:
Autopilot Remove Noise settings (unaltered)
My Verdict:
Poor quality file overall given it's a high ISO image on a crop sensor, and shot at 600mm
Noise cleaned up very nicely without introducing overly soft textures
Minimal artifacts introduced in some of the foreground foliage
Attempt to manually use Sharpen settings introduced unacceptable artifacts throughout
EXAMPLE 4
Canon 80D, Tamron SP 24-70mm G2, ISO 1600
Raw file unaltered (default Lightroom sharpening only)
My Visually Perceived Issues:
Raw file has a lot of noise from the higher ISO

Photo AI Output Settings:
Autopilot Remove Noise settings (unaltered)
My Verdict:
Noise cleaned up well throughout foreground, with minimal artifacts
Background hills and mountains are a bit muddy, lacking in finer details; it's likely this could be remedied by dialing back the adjustment slider, or using the Normal option for noise reduction (this was generated using the Strong noise model)

EXAMPLE 5
Canon 80D, Tokina 11-20mm, ISO 16,000
Raw file unaltered (default Lightroom sharpening only)
My Visually Perceived Issues:
This is not a "real-world" test; this image was a composition test at night, hence the extremely high ISO
I wanted to throw something extreme at Photo AI to see how it handled the file, and to compare its results against Topaz DeNoise AI

Photo AI Output Settings:
Autopilot Remove Noise settings (unaltered)
My Verdict:
These results are bad... but it's also an awful file
A mix of muddiness and artifacts throughout the sky
The output file is unusable
I ran this file through Topaz DeNoise AI, as well, to see if I could better results. Surprisingly, I was unable to achieve anything that surpassed Photo AI's results; it's actually easy to claim that DeNoise AI performed far worse:

No matter which noise removal engine I tried in DeNoise AI, or how much I tinkered with sliders, I was unable to improve upon the horribly blotchy results you see above. That doesn't mean Photo AI did a good job, but it certainly did better than DeNoise AI.
EXAMPLE 6
Canon 80D, Tamron SP 70-200mm G2 w/Tamron 2x Teleconverter, ISO 2000
Raw file unaltered (default Lightroom sharpening only)
My Visually Perceived Issues:
Very high levels of noise due to shooting with ISO 2000 on a crop sensor in poor light

Photo AI Output Settings:
Autopilot set Remove Noise to Strong (MODIFIED)
Manually set Remove Noise to Normal, instead of Strong as chosen by Autopilot
My Verdict:
Photo AI did a nice job of removing the high ISO noise
There are some minor artifacts around the debris in the antler and the foreground flowers, but it's pretty minimal
I'm surprised that Photo AI did not apply any Sharpen settings as Autopilot results are a bit soft looking but, overall, very good results
Bumping the noise reduction model to Normal instead of Strong brought back some details that were lost initially (see video)
EXAMPLE 7
Canon 80D, Tamron SP 150-600mm G2, ISO 1600
Raw file unaltered (default Lightroom sharpening only)
My Visually Perceived Issues:
Images appears to be slightly out of focus
A fair bit of noise due to higher ISO

Photo AI Output Settings:
Autopilot Remove Noise (unaltered)
My Verdict:
Noise was removed well without any obvious muddiness
Image still looks very soft; surprised that Photo AI did no sharpening
It seems there's a trend of soft images not being recognized as such by Autopilot
Due to the remaining softness in the Photo AI results, I decided to run the raw file through Topaz Sharpen AI, as well. Here's the comparison between Photo AI's output and Sharpen AI:

While still a bit soft, Topaz Sharpen AI definitely did a far better job of recognizing the softness and attempting to correct it, whereas, according to Photo AI, the photo was in focus. Sharpen AI also cleaned up the noise fairly well, although the sharpening did introduce some artifacts (could likely be further refined with more time spent in Sharpen AI).
It's quite likely I could have achieved similar results in Photo AI by manually enabling Sharpening but, again, I wanted to see how it performed with it's Autopilot analysis and settings since the intent of the new app is to simplify and streamline the overall image quality process.
EXAMPLE 8
Canon 80D, Tamron SP 150-600mm G2, ISO 800
Raw file unaltered (NO default Lightroom sharpening)
My Visually Perceived Issues:
Main issue is the image is a bit soft
Minimal noise from shooting at ISO 800
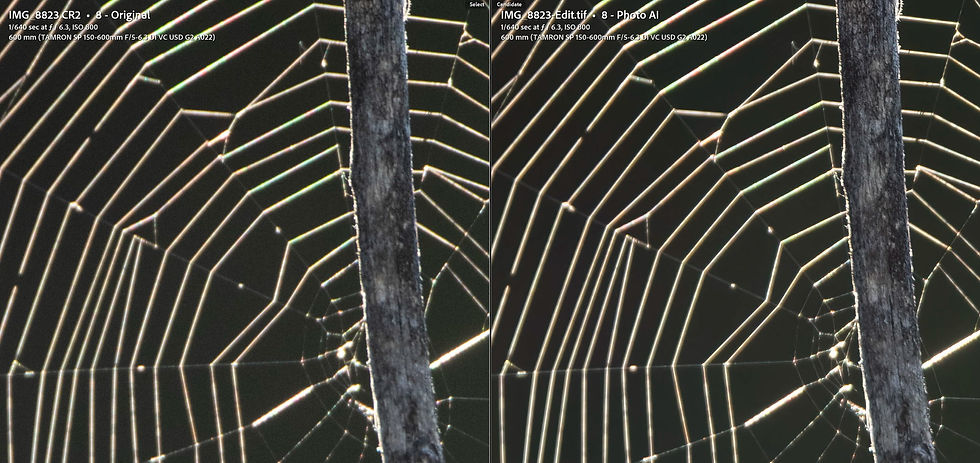
Photo AI Output Settings:
Autopilot Remove Noise (unaltered)
My Verdict:
If you watch the video, you'll hear my surprise at how this one turned out
I expected some of the finer details in the web to be lost, but they weren't
Noise nicely cleaned up without artifacts, and the bark was sharpened up cleanly, too
Much of the less intense fringing from chromatic aberration was removed, which was a nice surprise (although stronger aberrations were not touched)
EXAMPLE 9
Canon 80D, Tamron SP 24-70mm G2, ISO 1600
Raw file unaltered (multishot vertical pano merged in Lightroom, default Lightroom sharpening)
My Visually Perceived Issues:
Very noisy due to high ISO in less-than-ideal light
Sharpness looks good
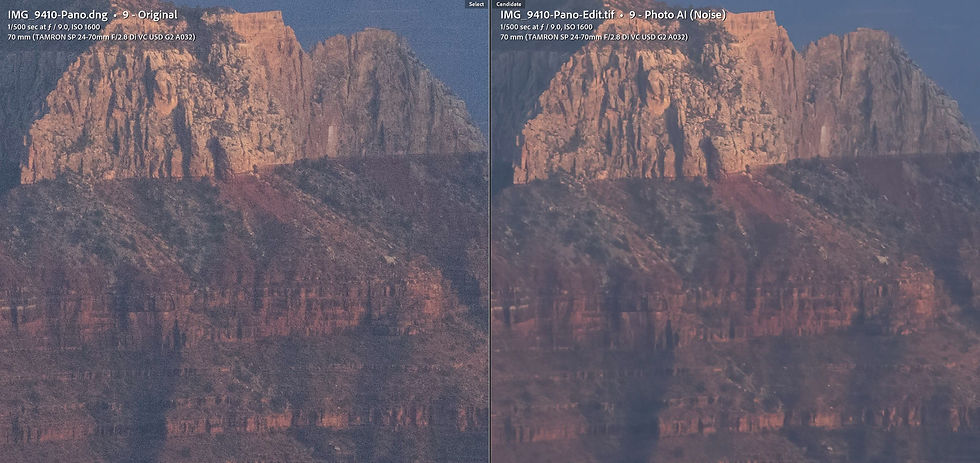
Photo AI Output Settings:
Autopilot Remove Noise (unaltered)
My Verdict:
Unacceptable muddiness introduced that destroyed fine details, especially in darker midtones and shadows
Some apparent sharpness lost to the aggressive noise reduction
I expected better results on this one and was disappointed. I also ran the raw file through Topaz DeNoise AI to see if I could get better results, either automatically or with manual adjustments:

While the DeNoise AI output could be said to still have some noise, I was able to do a far better job of retaining details by playing with the settings (I believe I changed it from the automatically selected Standard noise reduction to Low Light).
If you download the high-resolution sample files, you'll really be able to see the difference between the two in regard to details lost in Photo AI versus those preserved in DeNoise AI.
Once again, I suspect I could have gotten a better result out of Photo AI had I reduced the slider amount for the Strong noise reduction or switched it over to the Normal model.
EXAMPLE 10
Canon 80D, Tamron SP 150-600mm G2, ISO 800
Raw file unaltered (NO default Lightroom sharpening)
My Visually Perceived Issues:
Raw file had a higher-than-expected level of noise in the sky; when trying to edit in the past, I was unable to clean it up acceptably
There's some definite softness in the details, likely from shooting at ISO 800 with the lens extended all the way to 600mm, where it's known to lose sharpness

Photo AI Output Settings:
Autopilot Sharpen (default settings, but with Sharpen masking turned off)
My Verdict:
I'm very happy with the final results on this particular image
As shown in the video, the default masking that I turned off was quite poor
Photo AI did a great job of cleaning up the noise in the sky
It also did a fantastic job of recovering sharpness and details in the landscape, without introducing artifacts
EXAMPLE 11
Canon 80D, Tamron SP 70-200mm G2, ISO 1250
Raw file unaltered (default Lightroom sharpening only)
My Visually Perceived Issues:
Quite noisy, especially in darker tones
Maybe a little soft, but that's most likely due to the noise

Photo AI Output Settings:
Autopilot Remove Noise (unaltered)
My Verdict:
Overall, a very good result
There are a few areas - especially in the sandy hills - where perhaps there's too much data removed for the noise cleanup, but they are minimal and not easily noticeable without a side-by-side comparison to the raw file
I probably could have tried changing the Remove Noise setting from Strong to Normal to try to recover some of those details but, overall, the results are still acceptable
EXAMPLE 12
Canon 80D, Tamron SP 70-200mm G2, ISO 800
Raw file unaltered (default Lightroom sharpening only)
My Visually Perceived Issues:
In general, the image is sharp, but the camera sensor appears to have struggled to clearly resolve the fine details of the aspen leaves
Noise levels are acceptable
This was primarily a test to see how Photo AI would do in trying to recover/correct those fine details in the trees (a tough challenge)

Photo AI Output Settings:
Autopilot Remove Noise (unaltered)
My Verdict:
As noted, this is a challenging image
There is very little noticeable difference between the raw file and the Photo AI results; aspen leaves are slightly better defined
No notable differences elsewhere
For the sake of this examination of Topaz Photo AI, I decided to try running the raw file through Topaz Sharpen AI, as well:

I was able to create some more definition in the photo with Sharpen AI. There's slightly more edge contrast in the leaves and, more so, in the tree trunks.
While I wanted to compare results to the unaltered Photo AI Autopilot settings, I suspect I may have been able to match, or get close to, the Sharpen AI results if I had adjusted the Sharpen amount slider in Photo AI.
Either way, the differences are still so negligible to the raw file this is likely an example where it just doesn't make sense to move outside of your standard photo editing software (in my case, Lightroom Classic).
EXAMPLE 13
Canon 80D, Tamron SP 150-600 G2, ISO 100
Raw file unaltered (default Lightroom sharpening only)
My Visually Perceived Issues:
Taken at 600mm, there was a fair bit of atmosphere between my camera and the tree line
The trees are slightly softer than I'd like (especially with an intent to crop in)
The moon is quite soft, likely due to not using a fast enough shutter speed (1/30th of a second)... that sucker moves quickly at 600mm!

Photo AI Output Settings:
Autopilot Remove Noise (unaltered)
My Verdict:
This file isn't noisy... yet we again see Photo AI choose Remove Noise over Sharpen
Regardless, the default sharpening that's applied with noise reduction still sharpened things up nicely, with minimal artifacts (that likely wouldn't be noticed in normal viewing conditions)
Since my perception was that the file needed sharpening instead of noise reduction, I ran the raw file through Sharpen AI, as well:

While the Sharpen AI version is definitely sharper, I feel it's too sharp (and this output file was after a fair bit of tweaking of settings). It's not terrible, but there are some definite artifacts introduced, especially along the right edge of the moon.
In this case, I feel Topaz Photo AI outperformed Sharpen AI as it produced a more balanced and refined file.
EXAMPLE 14
Canon 80D, Tamron SP 150-600mm G2, ISO 800
Raw file unaltered (default Lightroom sharpening only)
My Visually Perceived Issues:
Focus is just a touch softer than I'd consider acceptable
There's a decent amount of noise in the darker areas of the photo

Photo AI Output Settings:
Autopilot Remove Noise (unaltered)
My Verdict:
This is another example where I expected Photo AI to choose Sharpen over Remove Noise
Oddly, the brighter areas don't seem to have received as much "default sharpening" via the Remove Noise settings as some of the mid-tone areas
The shadows were cleaned up nicely, without any obvious signs of muddiness/loss of fine details
Given the subtlety of this file and the Photo AI results, I'm not sure it's much better than what I could achieve in Lightroom
Since I felt the output file wasn't far off from what I could get using the Lightroom Details panel, I also ran the raw image through Topaz DeNoise AI to see if I could improve upon the Photo AI results (I chose to use DeNoise AI instead of Sharpen AI since the Photo AI Autopilot chose Remove Noise):

While my initial impressions of the Photo AI file were positive overall, and I didn't feel there was a noticeable loss of detail in the cleaned-up shadows, comparing the DeNoise AI version - using the Low Light engine - there are definitely more fine details retained in the darker areas of the image.
Although I still don't think the results are drastically better than Lightroom, if I had to choose, I would definitely go with the DeNoise AI file.
EXAMPLE 15
Canon 80D, Tamron SP 150-600mm G2, ISO 1000
Raw file unaltered (default Lightroom sharpening only)
My Visually Perceived Issues:
Focus is just a bit softer than desired
Although shot in good light, there's still a fair bit of ISO noise in the sky

Photo AI Output Settings:
Autopilot Sharpen (unaltered)
My Verdict:
Frankly, I get the sense that this image falls into Topaz's wheelhouse
Their software seems to perform exceptionally well on most wildlife, and Photo AI met that standard with this example
Photo AI did a great job of sharpening up the image while also completely eliminating the ISO noise in the sky
I have no complaints with this result at all; it's a very usable file
EXAMPLE 16
Canon 80D, Tamron SP 150-600mm G2, ISO 800
Fully edited raw file w/significant crop (default Lightroom sharpening only)
My Visually Perceived Issues:
With Lightroom sharpening and noise reduction, the file was a bit softer than desired (although fairly clean for normal viewing)
Removing all but the default Lightroom sharpening, I wanted to see how Photo AI performed with a raw file that was already edited

Photo AI Output Settings:
Autopilot Remove Noise (unaltered)
My Verdict:
Not to sound like a broken record (or a skipping CD for you younger folk), I kind of expected Photo AI to choose Sharpen over Remove Noise... but I think it did a very good job, regardless
The sky cleaned up perfectly, and there are essentially no artifacts introduced in the finer details of the juvenile eagle's feathers
EXAMPLE 17
Canon 80D, Tamron SP 150-600mm G2, ISO 1250
Fully edited raw file w/significant crop (default Lightroom sharpening only)
My Visually Perceived Issues:
The photo is pretty sharp, but there's softness due to the high ISO noise

Photo AI Output Settings:
Autopilot Remove Noise (unaltered)
My Verdict:
Once again, we see Topaz do a great job on a wildlife photo
The ISO noise has been completely removed from the sky and the eagle
I cannot detect any artifacts introduced through the process
Purely out of curiosity - since I'm happy with the Photo AI results - I decided to run this image through Sharpen AI and DeNoise AI so I could compare the results:

At first glance, I thought these files were almost identical, but if you look at the feathers you'll see that Sharpen AI actually introduced quite a lot of artifacts that aren't present in the Photo AI file that used the Remove Noise Autopilot settings. This is a definite win for Photo AI.
It's when we inspect the comparison between Photo AI and DeNoise AI that I believe we see an almost identical result:

Or do we?
If I lean in and really examine the underside of the eagle's wing, there may be some slight introduction of artifacts in the DeNoise AI file. And I mean slight.
For all intents and purposes, I'd call this a tie. Without looking at the side-by-side, and without pixel peeping at 100% zoom, I would never notice any difference.
Considering Photo AI generated its result automatically, I'd call this another win for that app just because it was simpler to get a great result without any tinkering.
EXAMPLE 18
Canon 80D, Tamron SP 150-600mm G2 + Tamron 2x Teleconverter, ISO 2500
Raw file unaltered (default Lightroom sharpening only)
My Visually Perceived Issues:
At ISO 2500 on a crop sensor, the image is quite noisy
Focus is also very soft, very likely due to a too-slow shutter speed for the moon at this magnification (1,920mm full frame equivalent)
I mainly wanted to see what Photo AI would do with this file that's clearly out of focus
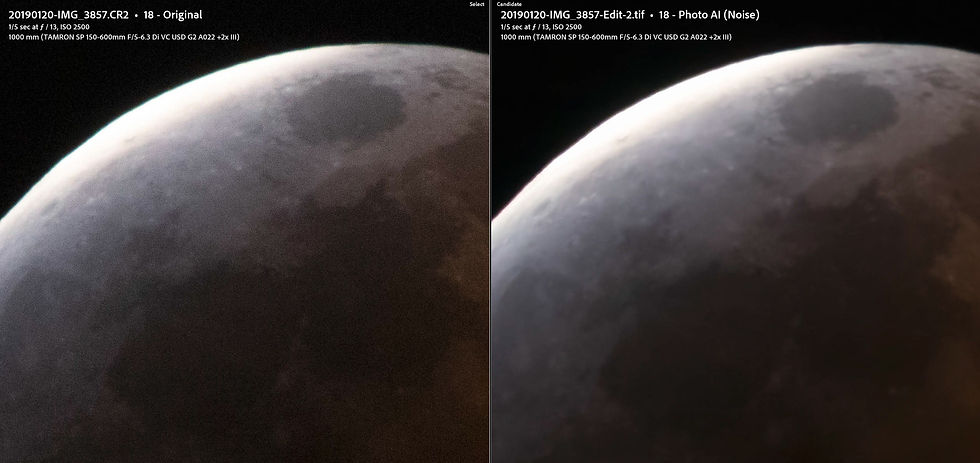
Photo AI Output Settings:
Autopilot Remove Noise (unaltered)
My Verdict:
Honestly, this may be the worst result I've seen with Photo AI
Even though sharpness is clearly the biggest issue with this photo, it once again automatically selected Remove Noise with no Sharpen settings applied
I did try adding sharpening in Photo AI manually, but was not happy with any of the results
Very disappointing results on this one; we've gone from a noisy, blurry moon to a blurry moon... let's cut our losses and move on to the next image!
EXAMPLE 19
Canon EOS R, Tamron SP 15-30mm G2, ISO 10,000
Raw file unaltered (default Lightroom sharpening only)
My Visually Perceived Issues:
This is another example of one I wouldn't necessarily consider a real-world example... it's more of a torture test for any noise reduction tool that's on the market
ISO 10,000 is extreme, and I wanted to see how Photo AI handled it

Photo AI Output Settings:
Autopilot Remove Noise (unaltered)
My Verdict:
Not great... but considering what we started with, it's not awful, either
The foliage actually doesn't look too bad
The sky is okay, all things considered: at normal viewing size/distance, there are no signs of big splotches or muddiness as we saw on example #5
The rock faces are, admittedly, a muddy mess
I likely could have pulled down the amount slider on the Strong noise reduction model and tried to recover some of those details, or tried Normal noise reduction, if the goal wasn't to see what Autopilot could do on its own
Now let's see if Topaz DeNoise AI did any better:

I decided to let DeNoise try to show off using its own automatic settings. The results are, well... basically identical. In some areas I may see just a bit more artifacts in the DeNoise version, but I may be imagining it, too.
I do think there is slightly more detail retained in the rockfaces. They look a little less muddy, especially in the lighter patch on the largest rockface on the right. Again, though, the improvement is so subtle it's not going to be noticeable if someone were to actually want to use this file for anything other than viewing on a phone.
All said and done, comparing apples to apples (Autopilot in Photo AI and the auto settings in DeNoise AI), I think Photo AI has done a pretty commendable job with a very tough file.
EXAMPLE 20
Canon EOS R, Tamron SP 24-70mm G2, ISO 6400
Raw file unaltered (default Lightroom sharpening only)
My Visually Perceived Issues:
My original intent for this image was to a) stack it with others taken before and after to perform Median noise reduction in Photoshop, and b) include it as part of a potential star trails shot
On a whim back in 2020, I decided to run it through DeNoise AI to see how it came out... and I was really happy with the results
Here, I wanted to take the original raw file and run it through Photo AI so I could compare it to the 2020 result
Ultimately, it's a well-focused image suffering from high ISO noise throughout

Photo AI Output Settings:
Autopilot Remove Noise (MODIFIED)
Normal noise reduction amount reduced ~5 points
My Verdict:
As far as the landscape photos I've tested, this may be the best result I've seen yet
The granite rockfaces basically look perfect, and if I hadn't taken the photo and seen the raw file, I probably wouldn't guess this started out as an ISO 6400 noisy file
The fine details of the trees in the valley look great, and surpass what DeNoise AI achieved back in 2020
The sky cleaned up very well, with just some very faint artifacts throughout (that I'd likely minimize by adding in a small amount of grain to the very clean file, if I'd even bother)
Next, I took the Photo AI output file and applied my edits to it so I could compare a finished version of the Photo AI file with the 2020 Topaz Denoise AI result:

Between the two, both look good but there are some definite advantages to the Photo AI file. There's less graininess and more details in the landscape, including the rockfaces, and noticeably more detail has been retained in the trees in the distant valley.
If you download the comparison files for a closer look, there's a significant improvement in the distant details in the face of Half Dome, and the midground mountainside. There's no question, Photo AI offers a pretty large improvement in overall quality compared to the results I got from DeNoise AI back in 2020.
The results for this image make me very excited for the potential of Photo AI as Topaz Labs continues to roll out improvements.
EXAMPLE 21
Canon EOS R, Tamron 100-4000mm, ISO 6400
Raw file unaltered (default Lightroom sharpening only)
My Visually Perceived Issues:
Pretty cut and dry: There's a fair bit of noise in the raw file due to the higher ISO, although given the conditions it's a fairly "clean" noise

Photo AI Output Settings:
Autopilot Remove Noise (unaltered)
My Verdict:
I'm less enthused about this one; it looks good, but not great
The background elements were cleaned up very nicely by Photo AI, but the main tree trunks were cleaned up too aggressively by the Autopilot settings and have become soft, and have lost some details
Photo AI did a great job of cleaning up the foliage in the darker shadows, and I'd actually argue that the shadow results look better than the lighter main trunks
Since I wasn't happy with the softness introduced into the main trunks, I also ran the raw file through DeNoise AI, using a manual override of the auto settings to choose Low Light instead of Standard (the Standard results looked almost identical to Photo AI):

The DeNoise AI results look fantastic. Having the ability to change the noise reduction model to Low Light made a huge difference in the details retained in the main trunks, without losing any of the positives that were seen in the Photo AI file.
Now, again, it's important to remember that my primary goal here was to test the Autopilot results within Photo AI. Could I have achieved similar detail retention by changing the noise reduction model or reducing the amount slider? Quite possibly.
EXAMPLE 22
Canon EOS R, Tamron 100-400mm, ISO 6400
Raw file unaltered (default Lightroom sharpening only)
My Visually Perceived Issues:
Total throw away shot of a bear in Colorado getting ready to rummage in a restaurant's trash bin, but it's another good opportunity to test the wildlife results for Photo AI
Raw file is acceptably sharp, but quite noisy due to low light and high ISO combo

Photo AI Output Settings:
Autopilot Remove Noise (unaltered)
My Verdict:
I wasn't surprised by this one: It turned out very well
All the fine detail in the bear's fur was fully retained while the noise is nicely removed
The surrounding foliage looks good, as well
The drool hanging from the bear's mouth didn't end up with any weird artifacts, as can sometimes happen in areas of high contrast like that
Overall, this would be a perfectly usable file, if desired
EXAMPLE 23
Canon EOS R5, Tamron 100-400mm, ISO 640
Raw file unaltered (default Lightroom sharpening only)
My Visually Perceived Issues:
Very slight noise in the shadows
Face is just slightly out of focus

Photo AI Output Settings:
Autopilot Sharpen + Face Recovery (MODIFIED)
I had to pull back the Face Recovery settings to avoid losing details in his beard and in the hair on the side of their head
My Verdict:
Photo AI did a good job of adding sharpness to their eyes, mouth, and most of their beard
The Autopilot settings were too aggressive, and detail was lost along their jawline and above the ear
I decided to try overriding the Autopilot settings, and am very happy with the final result
EXAMPLE 24
Canon EOS R5, Tamron 100-400mm, ISO 640
Raw file unaltered (default Lightroom sharpening only)
My Visually Perceived Issues:
Some very slight softness in the main tree structure
Before I reset the Lightroom Details settings, there were some minor sharpening artifacts introduced
I wanted to see how Photo AI would handle such a high key edit with such subtle details in the highlights

Photo AI Output Settings:
Autopilot Remove Noise (unaltered)
My Verdict:
Overall, Photo AI did a better job of sharpening details without introducing artifacts compared to Lightroom
On some of the very faint details, it did add in too much edge contrast (as seen in the video), but it was pretty subtle in the grand scheme of things
There was at least one area in the main tree structure that may have seen a loss of detail as Photo AI used Strong Remove Noise as its model (but it's not noticeable at normal viewing sizes/distances)
In the end, there may not be enough improvement to warrant bothering with an AI tool
What's New in Photo AI Since these Tests were Performed?
Photo AI Updates (October 2022)
I've released a new video in which I cover all the new features added to Photo AI since the beta version I tested above:
New Features Added to Photo AI (official release, version 1.0):
Subject mask refinement options
Autopilot automatically suggests upscaling for low resolution images
Added tooltips for every icon in the right panel
Added face selection/deselection
New Features Added to Photo AI (beta version 1.0.5):
Preferences for customizing Autopilot
Default subject detection model
Disable automatic face detection
Choose blur levels for sharpening recommendations
Customize resolution/scaling targets for auto upscaling
New sharpen modeling to better handle low amounts of blur without over-sharpening
New sliders for more control over parameters
Numerous performance and memory optimization improvements
Be sure to watch my new Photo AI walkthrough video to see all the updates in action!
Photo AI Updates (September 2022)
As of late in the day on September 1, Photo AI beta version 0.9 is available. Mostly, this new version includes various bug fixes, but there are a couple notable items worth calling out:
You can now send raw DNG files from the Lightroom Classic plug-in module directly to Photo AI, removing the need to convert your images to TIFF files
Tool tips within the app (upon hover) have been fixed
Topaz's internal tests show a 9% improvement in quality of results
The basic raw file editing tools have been removed for further work
The Image Quality score I talked about in the video has been removed, at least for the time being
Final Thoughts
Overall, I'm pretty impressed with Topaz Labs new Photo AI app. Is it perfect? No. Are the standalone apps always perfect? Absolutely not.
Does it match, or sometimes outperform, the standalone apps in many cases? Definitely.
Keeping in mind the above examples are all from the pre-release beta, and also keeping in mind that for all but a couple output files I did not alter the Autopilot settings (meaning I didn't try to refine the results), I really like the direction we're headed with Photo AI.
It completely eliminates much of the guesswork around which Topaz AI app is the best tool for the job, and that's really the whole point of having this new all-in-one, simplified app.
I'm sure there will be scenarios where the standalone apps are still required given the additional controls they offer, but, again, Photo AI should continue to improve and see additional features added over time (Per their FAQ regarding Photo AI: "Eventually, Topaz Photo AI will have all the features needed to fully take over the function of DeNoise AI, Sharpen AI, and Gigapixel AI. At that point, it may fully replace these applications").
If you've watched the video, or plan to watch it, you'll see that the biggest issue with the app right now (in version 0.8) is the horrible subject detection and masking. Fortunately, that only comes into play with the Sharpen function of Photo AI and can be turned off with a simple toggle.
Speaking of the video, if you want to see the different controls that are available in Photo AI, definitely give it a watch. Whereas I mostly stuck with the Autopilot output settings for the comparisons you saw in this blog post, I tried out most of the refinement options, including Enhance, in the video.
If you're ready to take the plunge, please don't forget to consider using my affiliate link! Your support will always be greatly appreciated and will go a long way towards ensuring I can continue to provide content like this going forward.
What do you think of the results? Impressed? Disappointed? Excited? Let me know in the comments below! Also feel free to ask questions, and I'll do my best to answer them, or add additional info/tests to this post.
As always, thanks for stopping by and, until next time, take care.
-MR

Support My Work
I've been pursuing my passion for photography, while producing educational resources and other content, for several years now. It has required plenty of time, patience, and monetary investment. Without my supporters, none of it would be possible. Every contribution, no matter the amount, allows me to continue creating new work while sharing my love for the natural world.
Become a member of my Patreon to earn exclusive perks, such as ad-free videos, early access to my ebooks, exclusive discounts, and even free prints and limited-edition folios.

You may also make a one-time donation via PayPal. However you choose to contribute, it will be greatly appreciated.
Join the Community
Sign up for a free site membership to leave comments under your own name and receive notifications when I or others reply to your comments (or like them). You'll also receive a special welcome offer towards your next order of my open-edition fine art prints.


Comments